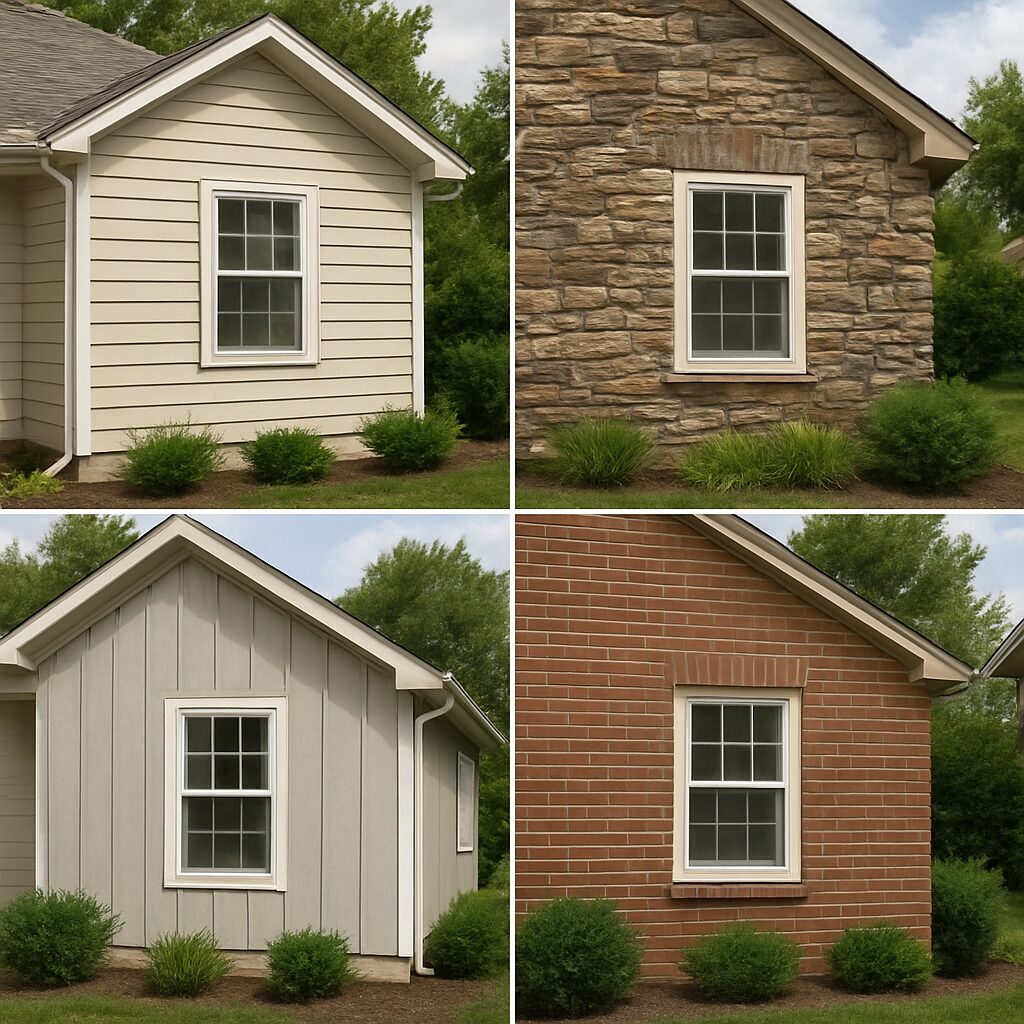
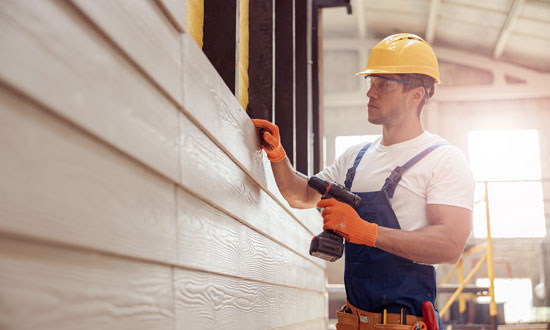
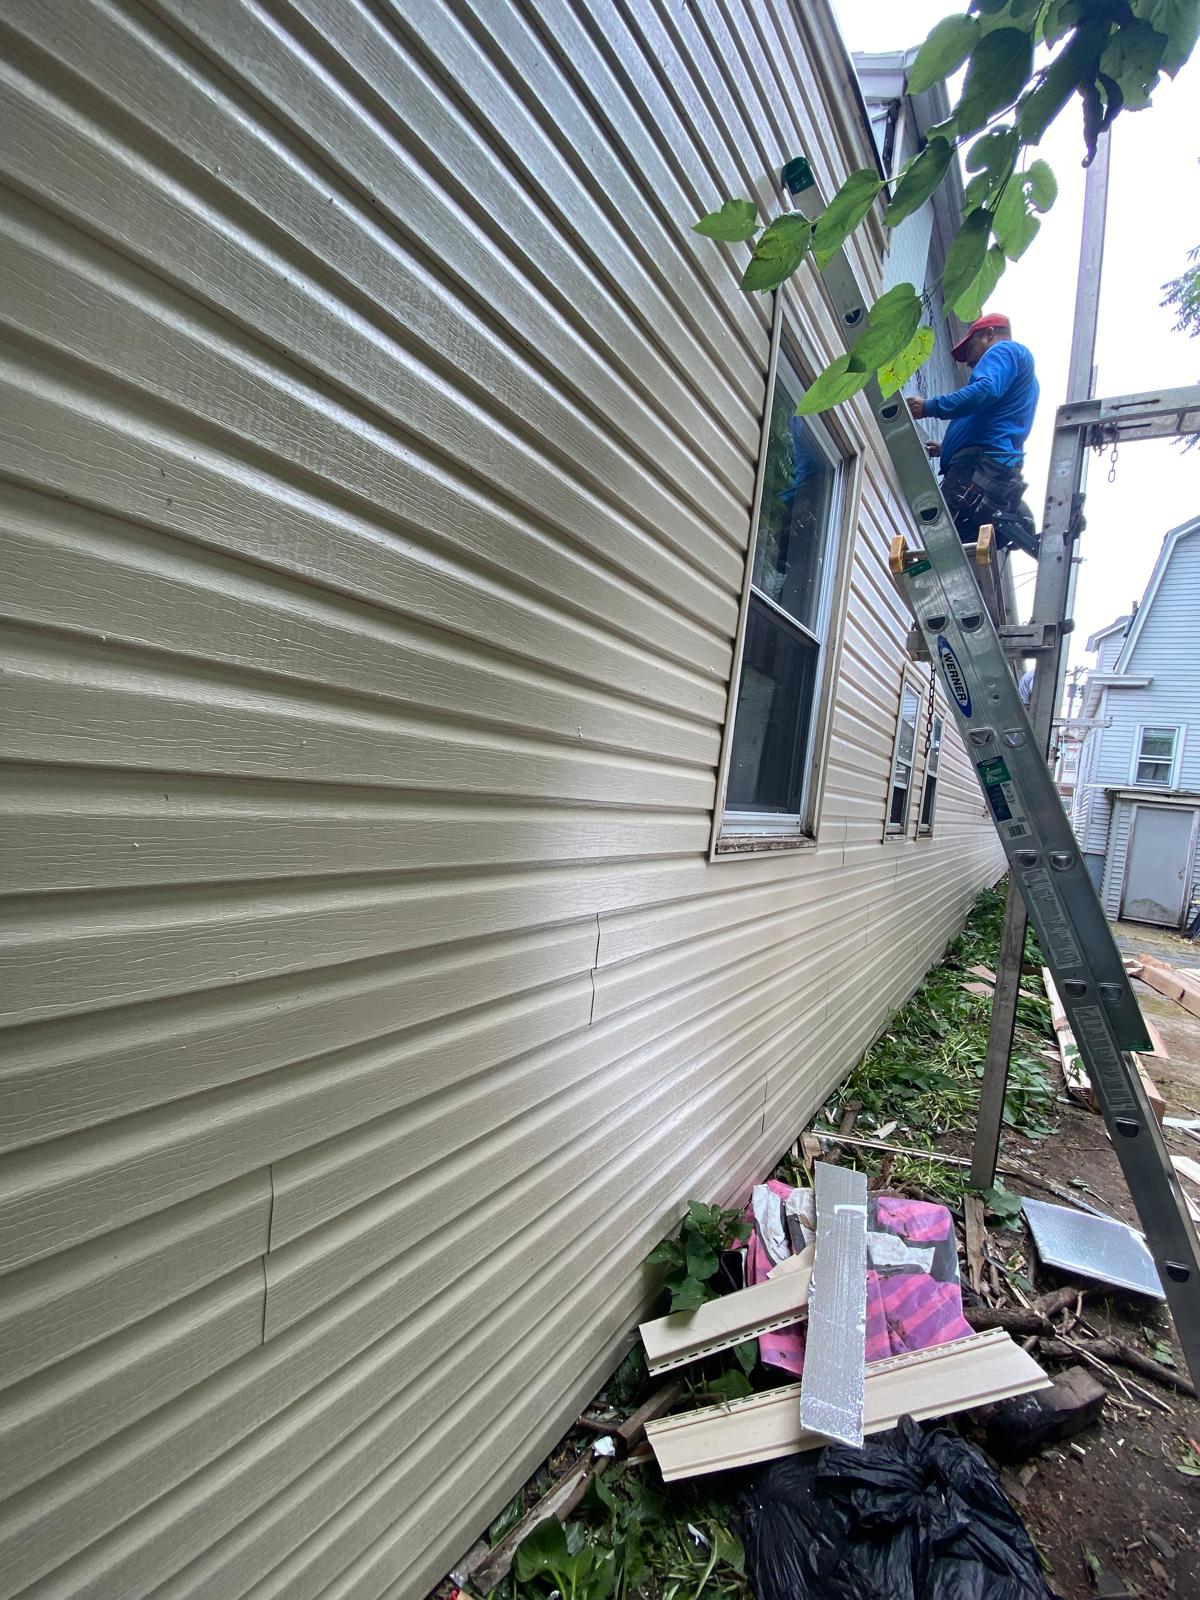
Replacing siding on a house in New Jersey is a significant home improvement project. It can enhance curb appeal and increase property value. But how much does it cost? The cost varies based on several factors, including the size of your home and the materials you choose. Vinyl and fiber cement are popular options, each with its own price range. Understanding these costs is crucial for budgeting and planning. This guide will help you navigate the complexities of siding replacement in New Jersey. We’ll explore material options, installation processes, and key factors affecting prices. Let’s dive into the details to make informed decisions. Average Siding Replacement Cost in New Jersey The average cost to replace siding on a house in New Jersey typically ranges from $5,000 to $15,000. This variance in price depends largely on the size of your home and the material used. Vinyl siding, a popular and cost-effective choice, usually costs between $3 and $8 per square foot. Fiber cement, known for its durability, comes at a higher cost of $5 to $13 per square foot. Several factors contribute to these costs, including labor rates in your area. Urban areas tend to have higher labor costs due to increased demand and cost of living. Considerations like the architectural complexity of your home can also influence pricing. The number of stories or unique design features can increase labor intensity. For an accurate estimate, it’s important to obtain multiple quotes. Contact several local contractors to compare prices and services. These insights provide a starting point for budgeting your siding replacement project. Anticipate variations and plan accordingly to avoid surprises. Siding Material Options and Their Costs When selecting siding for your home, various materials are available, each with unique benefits and costs. Choosing the right siding involves balancing initial expense, durability, and maintenance needs. Vinyl siding is a top choice due to its cost-efficiency and low upkeep. It offers considerable savings upfront and requires little maintenance over the years. Fiber cement siding attracts homeowners seeking durability and a premium appearance. Although pricier than vinyl, it offers longer-term resilience and better aesthetic options. Other options include wood, metal, and stone veneer. Each has distinct costs and aesthetic appeals, warranting careful consideration. Consider these common siding materials: When choosing siding, evaluate life cycle costs, not just initial expenses. Understand the longevity, maintenance demands, and energy efficiency each material provides. Additionally, consider your home’s architectural style and neighborhood norms. This holistic approach ensures you select siding that fits both your aesthetic desires and budget constraints. Vinyl Siding Cost in NJ Vinyl siding is a preferred choice for many New Jersey homeowners due to its affordability and versatility. Prices for vinyl siding typically range from $3 to $8 per square foot, making it one of the most cost-effective options available. In addition to being affordable, vinyl siding is available in various styles and colors. This allows homeowners to customize their home’s exterior to match personal taste while maintaining a budget-friendly approach. Key benefits of vinyl siding include: Overall, vinyl siding’s combination of low cost and variety makes it an appealing choice for those looking to update their home’s exterior without breaking the bank. Fiber Cement Siding and Other Popular Choices Fiber cement siding offers durability with a high-end look, making it a favorite among homeowners who prioritize long-term value. While its cost, between $5 and $13 per square foot, is higher than vinyl, it provides excellent resilience and an elegant appearance. Apart from fiber cement, other attractive materials include wood and metal. Wood offers a natural, classic appeal but requires more maintenance and carries a higher price. Metal siding boasts low maintenance and fire resistance, offering a more modern look. However, it can cost more than vinyl and should be considered based on specific needs. Consider these materials based on: Making a well-informed choice can ensure enduring satisfaction and curb appeal for your home’s exterior. Key Factors Affecting Siding Replacement Prices Several factors can impact the cost of siding replacement in New Jersey. The size and style of your home play a significant role in determining overall expenses. Larger homes require more materials and labor, driving up costs. Similarly, intricate architectural details or multiple stories add complexity, increasing labor costs. Labor rates are another crucial factor. Urban areas in New Jersey may have higher labor costs compared to rural locations. Weather conditions in New Jersey also affect siding prices. Seasonal changes can influence demand, leading to price fluctuations. Consider the following factors when estimating replacement costs: Additionally, homeowners should factor in the potential need for repairs. Underlying issues like water damage or insulation problems can increase project costs. Obtaining multiple quotes from reputable contractors can ensure competitive pricing and help you identify the best option for your project. By understanding these factors, you can better anticipate the overall investment required for siding replacement. This knowledge will help you make informed decisions and budget accordingly. Siding Installation Process in New Jersey The siding installation process in New Jersey involves several key steps to ensure a successful outcome. Before new siding can be applied, the old siding must be removed. This step may also involve disposing of debris, which can affect overall costs. Once the old siding is gone, the surface is prepared. This preparation ensures that the new siding can adhere properly and last longer. Contractors may also install moisture barriers at this stage. Next, the new siding is installed. This step requires precision to ensure protection against weather and improve home aesthetics. Depending on the complexity, this phase can take a few days to complete. Key steps in siding installation include: Finally, a thorough inspection ensures that the siding is properly installed. Contractors conduct a cleanup after the project concludes, leaving your home refreshed and ready for the elements. How to Estimate the Amount of Siding You Need Estimating the amount of siding needed is essential for budgeting and planning. Begin by measuring the surface area of your home’s exterior walls. Calculate the area
How to Install Siding Starter Strip on a Hillside House
When building or renovating a home on a hillside, you are not just battling the usual elements—you are fighting gravity, accelerated water runoff, and unique structural shifts. While the view from a sloped property is often breathtaking, the engineering required to protect it is demanding. One of the most critical, yet often overlooked, components of this protection is the siding starter strip. The starter strip is the foundation of your entire siding job. If it is unlevel, the whole wall will be crooked. If it is loose, your siding could blow off in high winds. And on a hillside home, where moisture moves differently and wind loads can be higher, a faulty starter strip can lead to catastrophic water damage behind your cladding. This comprehensive guide will walk you through exactly how to install a siding starter strip on a hillside house, ensuring your home remains beautiful, dry, and structurally sound for decades to come. Understanding the Starter Strip: More Than Just a Base Before you pick up a hammer, it is crucial to understand what a starter strip actually does. In standard construction, it locks the first course of siding in place. However, on a hillside property, its role expands significantly. The First Line of Defense Against Moisture Hillside homes are subject to “microclimates.” The slope of the land can accelerate rainwater runoff toward your foundation or create wind tunnels that drive rain upwards against the house. The starter strip acts as a mechanical locking mechanism that resists this uplift. Furthermore, it works in tandem with your flashing to ensure that water running down the sheathing is directed out away from the foundation, rather than wicking up behind the siding. Structural Integrity on Uneven Ground Foundations on slopes often settle differently than those on flat ground. A properly installed starter strip helps absorb some of these minor shifts without buckling the siding panels above it. It establishes a level reference line for the entire house, visually correcting the optical illusions often caused by sloping terrain. Pre-Installation Assessment: Mastering the Slope Installing siding on a hillside requires more preparation than a standard flat-lot project. You cannot simply snap a line and go; you must understand the geometry of the ground and the house. 1. Analyze the Slope and Drainage Walk the perimeter of the foundation. On the uphill side, the grade (ground level) might be significantly higher than on the downhill side. 2. Check the Foundation Level Foundations are rarely perfectly level, but hillside foundations can have significant variance due to the stepped footings often used in their construction. Essential Tools and Materials Hillside installations can be dangerous and physically demanding. Having the right gear ensures safety and precision. The Tool Kit The Materials Step-by-Step Installation Guide Now, let’s get to the installation. Follow these steps meticulously to ensure a weatherproof and level start. Step 1: Surface Preparation and Flashing Before the starter strip touches the wall, the surface must be impeccable. Step 2: Establish Your Chalk Line This is the most important step for aesthetics. Step 3: Fastening the Starter Strip Step 4: Handling the Slope and Grade Changes On a hillside, you may encounter areas where the foundation steps up or down. Final Inspections and Weatherproofing Once the strip is on, you aren’t quite finished. Verification Use your laser level one last time. Shine it across the top of the installed starter strip. It should be dead flat. If you see dips or humps, adjust the fasteners now. Fixing it later means ripping off the entire wall of siding. Pest Prevention Hillside homes often have decks or crawlspaces that attract wildlife. Check the gap between the starter strip and the foundation. If it is larger than 1/4 inch, consider installing a perforated vent strip or wire mesh to keep mice and wasps out of the rain screen. Weatherstripping In extreme hillside environments subject to driving rain, applying a bead of flexible exterior sealant behind the top edge of the starter strip (where it meets the sheathing) can provide a secondary gasket against water intrusion. Conclusion: A Foundation for Success Installing a siding starter strip on a hillside house is a precision game. It demands a clear understanding of water management, a steady hand with a laser level, and patience with the unique topography of your land. When done correctly, this strip does more than just hold up the first row of vinyl or fiber cement; it acts as a structural safeguard that extends the lifespan of your home’s exterior. By following these steps, you ensure that your hillside home stands resilient against wind, rain, and gravity. However, hillside projects often reveal hidden complexities—from rotting sub-structures to difficult drainage issues—that require a professional eye. Professional Siding Services in New Jersey If the complexities of hillside installation feel overwhelming, or if you simply want the peace of mind that comes with hiring certified experts, Deluxe Construction NJ is here to help. We specialize in high-quality siding solutions tailored to the unique landscapes of New Jersey. Whether you are in North or South Jersey, our team understands the local climate, building codes, and architectural challenges. Why Choose Deluxe Construction NJ? Don’t let a sloped lot compromise your home’s protection. Ensure your siding is installed correctly from the very first strip. Contact Deluxe Construction NJ today for your free estimate. Get a Free QuoteCall us: +1 (201) 552-1543Email: deluxeconstruction.nj@gmail.com
Siding Maintenance Tips for New Jersey Areas: Keep Your Home Protected Year-Round
Do you ever look at your siding after a brutal Nor’easter or a scorching August heatwave and think, “How much can this material really take?” You’re not alone! New Jersey’s unpredictable weather is harsh on everything, especially the exterior of your home. Your siding isn’t just a decorative shell; it’s the strong, reliable armor that protects your family and your most significant investment from everything Mother Nature throws at it. If your siding is starting to look a little tired, dull, or weather-worn, it’s a clear sign you need to step in. This guide shares simple, practical siding maintenance tips tailored for New Jersey’s climate so you can stop minor issues from becoming expensive headaches. The New Jersey Difference: Why Maintenance Is a Must-Do Here in the Garden State, we get it all: humid, sticky summers, freezing winters, heavy spring rains, and strong coastal winds. This seasonal rollercoaster creates a unique challenge for your siding. The constant cycle of extreme heat (expansion) and extreme cold (contraction) stresses your materials, which is why a small crack can quickly turn into a significant problem. Regular home exterior maintenance in New Jersey is your best defense against: What’s Your Siding Type? A Quick NJ Home Check Different materials demand different TLC. Here’s a quick rundown of the most common materials we see on New Jersey homes: Your Essential Siding Maintenance Checklist You don’t need to be a contractor to keep your siding in great shape. Just follow these seven straightforward steps for reliable siding maintenance in New Jersey. 1. Give It an Annual Bath (The Siding Cleaning NJ Edition) Dirt, mildew, and that green algae love New Jersey’s humidity. Once a year (spring is ideal!), clean your siding. Use a mild soap and a soft brush or a low-pressure washer. Crucially, always wash downwards to prevent water from spraying up and behind the panels. 2. Become a Gap Detective Walk the perimeter of your house twice a year—it’s great exercise! Look closely for any small cracks, gaps, or panels that have pulled away. Pay special attention after a big storm. Even the smallest opening is a potential water entry point. 3. Refresh the Caulk and Sealant Check around all your windows, doors, and utility entry points. If the old caulk is cracked or peeling, peel it out and apply fresh sealant. Proper sealing is critical; it keeps moisture out and helps save you money on your winter heating bill. 4. Don’t Let Paint Protection Fail Paint and sealant aren’t just for looks; they are the primary barrier against the elements. If you have wood or fiber cement, watch for chipping. Even for vinyl siding care in NJ, if the color is looking dull, a proper coat of approved paint can refresh the look and add protection for years. 5. Keep the Landscape Trimmed Back Your greenery is beautiful, but not when it’s touching the house. Keep bushes, vines, and tree branches several inches away from your siding. Constant friction traps moisture and can lead to abrasion, damaging the surface finish. 6. Watch for Warning Signs Be vigilant for subtle issues: bubbling paint, soft spots, or faint discoloration. These are often the first signs that moisture is trapped behind the siding, and that needs a professional look right away. 7. Schedule a Pro Check-Up Even the most dedicated homeowners miss things. We recommend having your siding checked by a trusted local expert every 2–3 years. They can spot minor structural or flashing issues that could lead to significant damage down the road. Seasonal Siding Tips (The NJ Homeowner’s Calendar) Your maintenance routine changes with the weather: Season Siding Maintenance Focus Why It Matters in NJ Winter Look for new hairline cracks created by freeze/thaw cycles. Ice expands and widens small gaps, leading to spring leaks. Spring Time for that big annual wash to remove road salt and grime. Snowmelt and road salts leave residue that damages the finish. Summer Check the most sun-exposed areas for fading and warping. High humidity and strong sun put the greatest stress on materials. Fall Clean your gutters and downspouts! Overflowing water is the number one cause of water penetration behind your siding. Time for an Upgrade? When to Stop Repairing There comes a point when maintenance just isn’t enough. It might be time to consider a complete replacement if you notice: A beautiful, well-maintained exterior is more than curb appeal; it’s peace of mind. By taking these simple steps, you can ensure your New Jersey home stays protected, looks fantastic, and maintains its value for decades to come. Tired of worrying about the next big storm damaging your exterior? If you’ve spotted a severe crack, noticed fading, or if your siding has seen too many New Jersey winters, it’s time to call in the local experts. At Deluxe Construction NJ, we understand the unique demands of the climate across every county—from Bergen to Cape May. We don’t just fix siding; we provide durable, weather-resistant solutions that are designed to last in the Garden State. Why choose Deluxe Construction NJ for your siding needs? Regular siding care keeps your home beautiful, energy-efficient, and structurally protected year-round. Don’t wait until a minor repair turns into a costly overhaul!