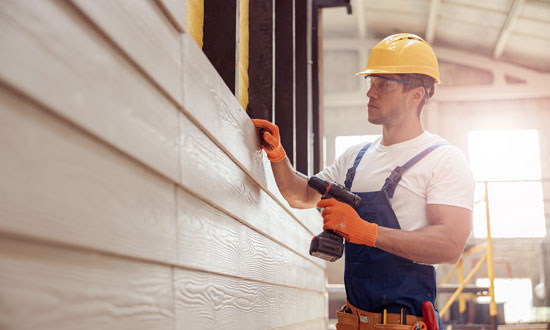
When building or renovating a home on a hillside, you are not just battling the usual elements—you are fighting gravity, accelerated water runoff, and unique structural shifts. While the view from a sloped property is often breathtaking, the engineering required to protect it is demanding. One of the most critical, yet often overlooked, components of this protection is the siding starter strip.
The starter strip is the foundation of your entire siding job. If it is unlevel, the whole wall will be crooked. If it is loose, your siding could blow off in high winds. And on a hillside home, where moisture moves differently and wind loads can be higher, a faulty starter strip can lead to catastrophic water damage behind your cladding.
This comprehensive guide will walk you through exactly how to install a siding starter strip on a hillside house, ensuring your home remains beautiful, dry, and structurally sound for decades to come.
Understanding the Starter Strip: More Than Just a Base
Before you pick up a hammer, it is crucial to understand what a starter strip actually does. In standard construction, it locks the first course of siding in place. However, on a hillside property, its role expands significantly.
The First Line of Defense Against Moisture
Hillside homes are subject to “microclimates.” The slope of the land can accelerate rainwater runoff toward your foundation or create wind tunnels that drive rain upwards against the house. The starter strip acts as a mechanical locking mechanism that resists this uplift. Furthermore, it works in tandem with your flashing to ensure that water running down the sheathing is directed out away from the foundation, rather than wicking up behind the siding.
Structural Integrity on Uneven Ground
Foundations on slopes often settle differently than those on flat ground. A properly installed starter strip helps absorb some of these minor shifts without buckling the siding panels above it. It establishes a level reference line for the entire house, visually correcting the optical illusions often caused by sloping terrain.
Pre-Installation Assessment: Mastering the Slope
Installing siding on a hillside requires more preparation than a standard flat-lot project. You cannot simply snap a line and go; you must understand the geometry of the ground and the house.
1. Analyze the Slope and Drainage
Walk the perimeter of the foundation. On the uphill side, the grade (ground level) might be significantly higher than on the downhill side.
- Clearance Check: Ensure you have adequate clearance between the ground and the start of the siding. Building codes typically require a minimum of 6 to 8 inches of clearance to prevent rot and termite infestation. On the uphill side, you may need to install a retaining wall or specialized flashing if the soil is too close to the sill plate.
- Runoff Patterns: Observe where water travels during a rainstorm. Does it pool against the foundation? Your starter strip installation must account for this by ensuring rigorous flashing protocols are met before the strip goes on.
2. Check the Foundation Level
Foundations are rarely perfectly level, but hillside foundations can have significant variance due to the stepped footings often used in their construction.
- Find the Lowest Point: Identify the lowest corner of the existing siding or sheathing. This will be your reference point.
- The “Optical Level” vs. True Level: On a hillside, a perfectly level line might look crooked because the ground slopes so dramatically. However, you must always install siding to true level, not parallel to the ground. Installing parallel to the slope will result in a disorienting, unprofessional finish.
Essential Tools and Materials
Hillside installations can be dangerous and physically demanding. Having the right gear ensures safety and precision.
The Tool Kit
- Laser Level: A standard bubble level isn’t enough for long runs on a hillside. A high-quality laser level is non-negotiable for establishing a perimeter datum line.
- Chalk Line: For snapping the layout lines.
- Power Drill and Impact Driver: For securing fasteners into tough substrate.
- Tin Snips/Aviation Snips: For cutting vinyl or metal starter strips.
- Utility Knife: For scoring and cutting materials.
- Caulk Gun: For applying high-grade sealants.
The Materials
- Starter Strip: Choose a material compatible with your siding (vinyl for vinyl siding, metal for fiber cement). On hillsides, aluminum or galvanized steel starter strips are often preferred for their rigidity and resistance to pests.
- Fasteners: Use corrosion-resistant nails (aluminum or galvanized roofing nails) or screws. They must be long enough to penetrate at least 3/4 inch into the solid wood stud or sheathing.
- Flashing Tape: Self-adhering flashing tape is essential for sealing the bottom of the wall before the strip is applied.
- Insect Screen (Optional but Recommended): On hillsides where the gap between siding and foundation varies, installing a mesh screen behind the starter strip can prevent rodents and insects from entering the wall cavity.
Step-by-Step Installation Guide
Now, let’s get to the installation. Follow these steps meticulously to ensure a weatherproof and level start.
Step 1: Surface Preparation and Flashing
Before the starter strip touches the wall, the surface must be impeccable.
- Clean the Area: Remove old caulk, dirt, and protruding nails. The sheathing should be flat and dry.
- Install House Wrap: Ensure your water-resistive barrier (WRB) extends over the foundation sill plate.
- Install Z-Flashing: If you are transitioning from concrete/stone foundation to wood framing, install metal Z-flashing. This guides water out over the material below.
- Tape the Seams: Use your self-adhering flashing tape to seal the bottom edge of the sheathing to the foundation. This is a critical air and moisture seal for hillside homes exposed to high winds.
Step 2: Establish Your Chalk Line
This is the most important step for aesthetics.
- Measure Down: Go to the lowest corner of the house. Measure up the width of the starter strip minus 1/4 inch (to allow for the siding to hang slightly below the strip). Mark this point.
- Shoot the Laser: Set up your laser level. Aim it at your mark.
- Mark All Corners: Walk around the entire house (or the specific wall you are working on) and mark this level line at every corner.
- Snap the Line: Connect the marks with a chalk line. Tip: If the run is longer than 20 feet, have a helper hold the line in the center to prevent sagging, or snap it in sections.
Step 3: Fastening the Starter Strip
- Position the Strip: Align the top edge of the starter strip with your chalk line.
- Fastening Technique:
- Nail Spacing: Place a nail every 8 to 12 inches.
- Centering: Nail in the center of the nailing slots. This is vital for vinyl products, which need to expand and contract with temperature changes.
- Depth: Do not drive the nails tight against the strip. Leave about 1/32 to 1/16 of an inch of space (the thickness of a dime) between the nail head and the strip. This allows for movement without buckling.
- Expansion Gaps: If you need to use multiple pieces of starter strip to cover a wall, do not butt them tight against each other. Leave a 1/4-inch gap between sections to allow for thermal expansion.
Step 4: Handling the Slope and Grade Changes
On a hillside, you may encounter areas where the foundation steps up or down.
- The Step-Down: When the foundation drops, you will need to lower your starter strip to match. Maintain the level line, but add a vertical J-channel or corner post to bridge the transition.
- Clearance Checks: As you move uphill, constantly check that your starter strip maintains the required distance from the soil. If the grade rises too sharply, you may need to step the siding up or regrade the soil.
Final Inspections and Weatherproofing
Once the strip is on, you aren’t quite finished.
Verification
Use your laser level one last time. Shine it across the top of the installed starter strip. It should be dead flat. If you see dips or humps, adjust the fasteners now. Fixing it later means ripping off the entire wall of siding.
Pest Prevention
Hillside homes often have decks or crawlspaces that attract wildlife. Check the gap between the starter strip and the foundation. If it is larger than 1/4 inch, consider installing a perforated vent strip or wire mesh to keep mice and wasps out of the rain screen.
Weatherstripping
In extreme hillside environments subject to driving rain, applying a bead of flexible exterior sealant behind the top edge of the starter strip (where it meets the sheathing) can provide a secondary gasket against water intrusion.
Conclusion: A Foundation for Success
Installing a siding starter strip on a hillside house is a precision game. It demands a clear understanding of water management, a steady hand with a laser level, and patience with the unique topography of your land. When done correctly, this strip does more than just hold up the first row of vinyl or fiber cement; it acts as a structural safeguard that extends the lifespan of your home’s exterior.
By following these steps, you ensure that your hillside home stands resilient against wind, rain, and gravity. However, hillside projects often reveal hidden complexities—from rotting sub-structures to difficult drainage issues—that require a professional eye.
Professional Siding Services in New Jersey
If the complexities of hillside installation feel overwhelming, or if you simply want the peace of mind that comes with hiring certified experts, Deluxe Construction NJ is here to help.
We specialize in high-quality siding solutions tailored to the unique landscapes of New Jersey. Whether you are in North or South Jersey, our team understands the local climate, building codes, and architectural challenges.
Why Choose Deluxe Construction NJ?
- Local Expertise: We know New Jersey homes and how to protect them from our freeze-thaw cycles and coastal storms.
- Comprehensive Services: From precise installations to thorough inspections and repairs, we handle it all.
- Quality Materials: We work with top-tier vinyl, fiber-cement, and wood siding to suit your style and budget.
- Customer-Centric: We pride ourselves on transparent pricing, clear communication, and exceptional craftsmanship.
Don’t let a sloped lot compromise your home’s protection. Ensure your siding is installed correctly from the very first strip.
Contact Deluxe Construction NJ today for your free estimate.
Get a Free Quote
Call us: +1 (201) 552-1543
Email: deluxeconstruction.nj@gmail.com