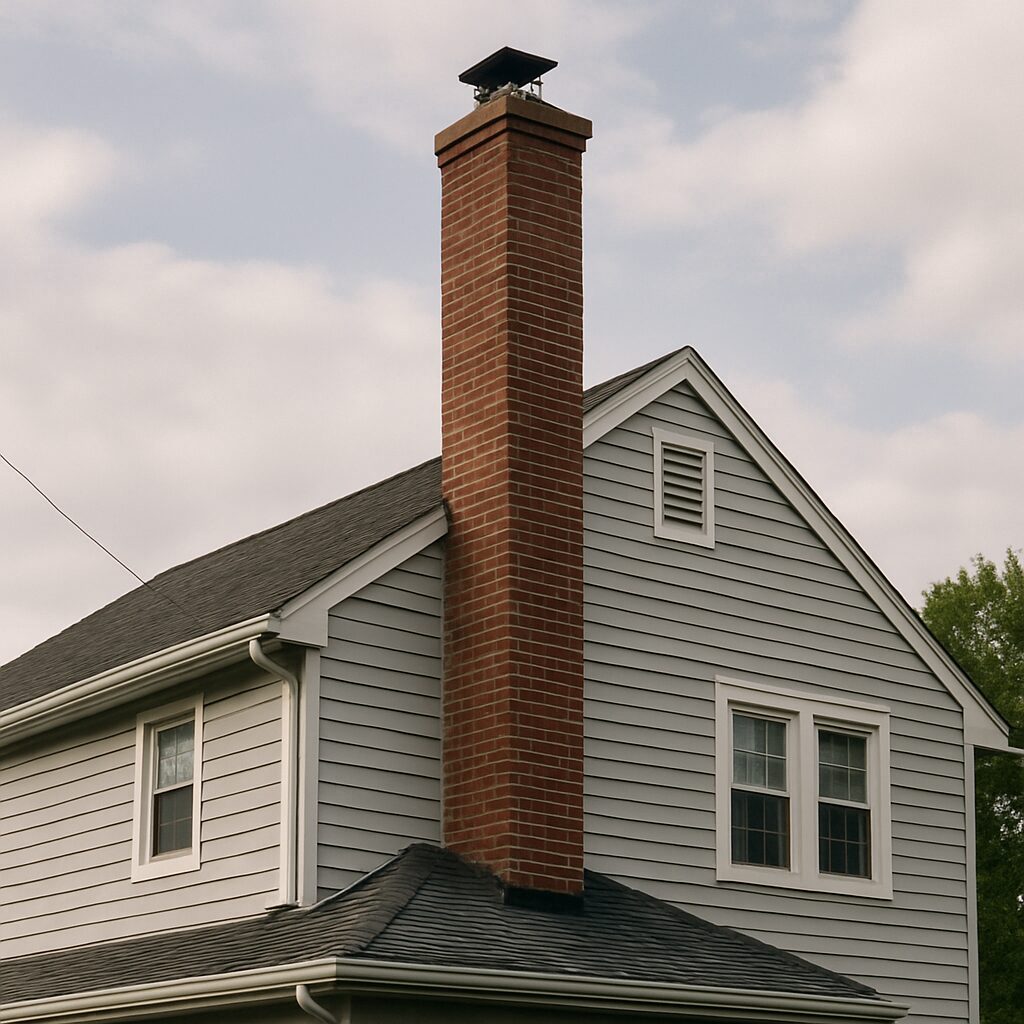
Homeowners in New Jersey often wonder if their insurance covers chimney repairs. This question is crucial, especially given the state’s varied climate. Chimneys are vital for home safety and comfort. They require regular maintenance to function properly. Insurance coverage for chimney repairs can be complex. It often depends on the cause of the damage. Understanding your policy is key. Not all damages are covered, and exclusions may apply. Regular inspections can prevent costly repairs. They may also be required by your insurer. This guide will help you navigate the intricacies of homeowners insurance for chimney repairs in New Jersey. Understanding Homeowners Insurance Coverage for Chimney Repairs in New Jersey Homeowners insurance generally provides coverage for chimneys under specific conditions. Typically, policies cover sudden and accidental damage. Understanding your policy is critical to know what’s included. In New Jersey, damage from events like storms or fires is often covered. Damage due to negligence or aging may not be included. The importance of knowing these details can’t be overstated. Review your policy for specific clauses related to chimney coverage. Policies can have unique terms, exclusions, or limitations. Common exclusions might involve gradual wear and tear or lack of upkeep. When reviewing your policy, consider the following: Understanding these elements helps in managing expectations. Regular consultations with your insurance agent can clarify questions. With the proper knowledge, you can effectively protect your home’s chimney. Common Causes of Chimney Damage and Insurance Implications Chimney damage can arise from various sources. In New Jersey, weather plays a significant role. Heavy storms or strong winds often lead to structural issues. Understanding these causes helps in assessing coverage. Typically, homeowners insurance covers weather-related damage. However, natural wear and tear or neglect usually aren’t covered. Knowing what your policy includes is vital. Some common causes of chimney damage include: Each type of damage has different insurance implications. For instance, fire damage is frequently covered. Conversely, water damage due to poor maintenance might not be. Ensuring your home’s regular upkeep is crucial. When you know what causes damage, you can take preventative actions. Regular inspections help reduce risks. Preparing for unexpected events also aids in navigating claims successfully. What Types of Chimney Damage Are Typically Covered? Homeowners insurance policies vary, but they often cover sudden and accidental damage. It’s important to know what your policy specifies. In many cases, coverage includes damage from unexpected events like fires or storms. For example, if a storm blows off chimney bricks, insurance might cover repairs. Wind and lightning damage is another common scenario. This type of coverage can ease repair costs significantly. Coverage usually applies to structural damage. Cracked or collapsed chimneys due to unforeseen events can qualify for claims. However, cosmetic damage without structural impact might not be covered. Types of chimney damage typically covered by insurance include: Insurers evaluate the cause and extent of damage. Documenting this helps in validating claims. Always read your policy carefully to understand specific terms. Knowing what’s included can save time and avoid unexpected financial burdens during repairs. What Is Not Covered: Exclusions and Limitations Homeowners insurance has exclusions, often leaving out wear and tear. Policies do not cover damage from regular use or neglect. Routine maintenance issues typically fall on homeowners. For instance, insurers might deny claims for damage caused by lack of upkeep. Cracks from settling or age-related deterioration generally aren’t covered. Understanding these limitations helps prevent surprises later. Commonly excluded damages include: Some policies might also exclude damage from pests or pre-existing issues. Reviewing and understanding your policy’s exclusions is crucial. This knowledge can help manage expectations and plan for necessary out-of-pocket expenses. Always maintain your chimney to avoid preventable damage and potential claim denials. The Importance of Regular Chimney Maintenance Regular maintenance is crucial for chimney health and safety. Proper upkeep can prevent damage from worsening over time. Moreover, insurers might require proof of maintenance for claims. Routine inspections can identify minor issues before they escalate. This proactive approach saves money and time. A well-maintained chimney also reduces fire risks in the home. Consider these maintenance tips: Adhering to these practices ensures your chimney stays in good condition. Regular maintenance fosters a safer home environment and can aid in successful insurance claims if needed. Steps to Take When Filing a Chimney Repair Insurance Claim in New Jersey Filing an insurance claim can be daunting, but preparation helps. Start by assessing the damage. Document everything with clear photos and notes. Next, review your insurance policy carefully. Understand what is covered and take note of any exclusions specific to chimney repairs. Contact your insurance provider promptly. Inform them about the damage and your intention to file a claim. They will guide you through their specific process. Gather necessary documentation. This includes repair estimates from professional contractors. An accurate assessment can bolster your claim’s credibility. Here’s a checklist to aid you in the process: Stay organized throughout the claims process. Keep records of all communication with your insurer. This includes emails, phone calls, and letters. Patience is key. Claims can take time, and following up may be necessary. With preparation and persistence, you can navigate the claims process successfully. Estimating Chimney Repair Costs in New Jersey Chimney repair costs can vary significantly depending on the damage extent. Factors like materials, labor, and repair type influence pricing. In New Jersey, minor repairs might cost a few hundred dollars. More extensive structural work can reach thousands, depending on complexity. Here’s what you might consider when estimating costs: Consulting a few professionals for estimates can provide a better price range. Detailed quotes help plan your budget and negotiate insurance claims more effectively. Tips for Maximizing Your Homeowners Insurance Claim Maximizing an insurance claim requires diligence and attention to detail. Begin by understanding your policy coverage thoroughly. Ensure that chimney repairs are covered under your specific circumstances. Documenting damage is crucial for successful claims. Take clear photographs immediately after the damage occurs. Gather all necessary repair estimates and other documentation supporting your claim. Consider these strategies to
How much does it typically cost to repair a roof leak
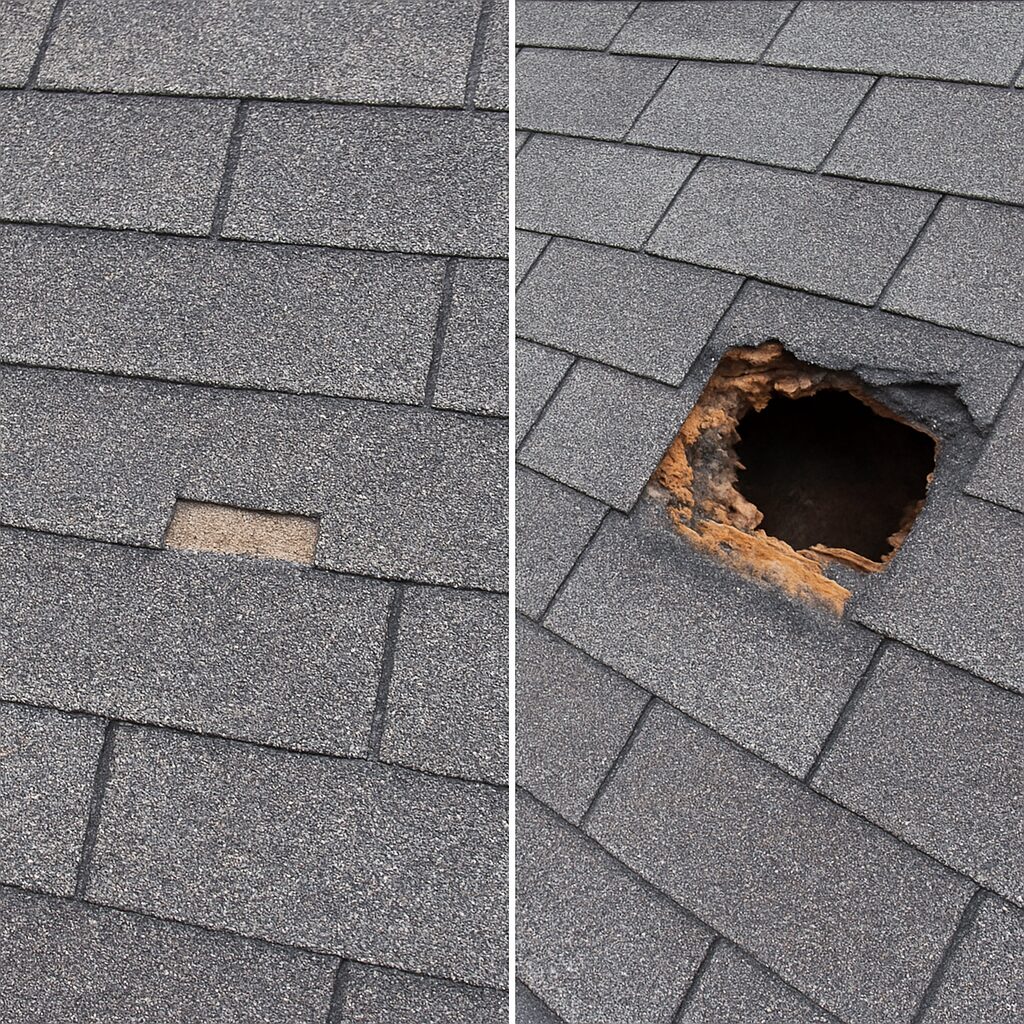
You hear the steady drip-drip-drip against the attic floor, and your first thought isn’t about the water itself—it’s about your bank account. That rhythmic sound often triggers a specific kind of homeowner panic, spiraling into visions of drained savings and massive construction crews taking over your driveway. But panic rarely leads to smart financial decisions. Instead of worrying about a worst-case scenario, the best way to regain control is to understand the financial reality before you ever pick up the phone to call a pro. Roof repair pricing often feels like a secret known only to contractors, leaving many homeowners to wonder exactly how much does it typically cost to repair a roof leak? While every house presents unique challenges, industry data reveals that most minor repairs fall between $300 and $1,500. This range serves as a critical anchor for your budget. Knowing this baseline immediately shifts your perspective from fearing a total replacement to managing a routine maintenance expense. Unless the damage is catastrophic, a small leak rarely requires tearing off the entire roof system. To see where that money goes, it helps to think of your home’s roof like a heavy-duty raincoat. A raincoat keeps you dry, but if a single seam splits or a button pops off, water will find its way inside regardless of how high-quality the fabric is. Your roof works the same way; it is a protective system that relies on tight seals around chimneys, vents, and valleys. Most roof repair cost estimates cover the labour and materials needed to fix these specific “seams” rather than replacing the coat entirely. Ignoring a small breach in that system, however, changes the maths rapidly. Water that lingers for even 48 hours can begin to soak into insulation and wood, inviting mould and rot that act as hidden cost multipliers. A simple patch job can quickly balloon into a structural overhaul if left unattended. By moving from anxiety to action today, you are protecting your home’s structure and preventing a manageable repair from becoming a $10,000 replacement down the road. Why Your Quote Varies: The Three Big Pillars of Roofing Labour and Materials When looking at a roofing cost estimate, homeowners often expect the price of shingles to drive the total. In reality, materials usually account for only about 30 to 40 per cent of the bill. The bulk of your expense goes toward the skilled professionals doing the work, much like how a mechanic’s invoice is mostly hourly wages rather than the cost of a new timing belt. This labour-heavy split happens because roofing is physically demanding, high-risk work that requires specific insurance and safety training to prevent accidents. Safety isn’t just a concern for the workers; it directly impacts your wallet through the “pitch” factor. In industry terms, pitch simply refers to the steepness of the slope. If a roof is walkable—meaning a worker can stand on it without special harness equipment—the labour rates for professional roofing contractors remain standard. However, once that slope becomes too steep to walk on easily, the price often jumps by 20 to 30 per cent. This surcharge covers the extra time needed to set up scaffolding, secure safety harnesses, and move materials slowly up a near-vertical surface. Beyond just the angle of the roof, the specific conditions of your home can shift roofing repair rates significantly. Contractors look for “access obstacles” that slow down the crew and increase the difficulty. Your quote will likely reflect a higher labour charge if the team encounters: Once the crew navigates these obstacles, they often find the culprit isn’t the shingle itself, but the metal seals around your chimney and vents. The Flash Point: How Fixing Chimney and Vent Seals Prevents Attic Floods Water rarely soaks directly through a solid shingle; instead, it sneaks in where the roof changes shape. These sensitive joints rely on strips of metal, known as flashing, to bridge the gap between your roofing material and vertical structures. Because metal expands and contracts with the weather, these seals can eventually wiggle loose or rust, leading to an average cost of roof flashing repair generally falling between $200 and $500. It is similar to the zipper on a raincoat—the fabric might be fine, but if the seal fails, you still get wet. Another frequent offender is the rubber “boot” that surrounds the plumbing pipes sticking out of your roof. Over time, harsh UV rays crack this rubber gasket, creating a direct path for water to drip into your attic insulation. Fortunately, the roof vent leak repair cost is usually minimal compared to major structural work. You can typically expect the cost to replace damaged roof vent boots to stay under $150 per unit, making it one of the most affordable ways to stop a ceiling stain in its tracks. Problems become more complex when the issue involves the bricks themselves rather than just the metal seal. If the mortar between your chimney bricks is crumbling, a roofer cannot simply glue new metal down; they often need a mason to repair the structure first. Consequently, chimney masonry and flashing repair estimates can climb significantly, sometimes exceeding $1,000 depending on the damage. To catch these weak points early, keep an eye on these four critical zones: Once you know where to look, you can often confirm your suspicions without ever climbing a ladder by using a simple trick involving your garden hose. Spotting the Source: The Garden Hose Trick to Find Leaks Before the Pro Arrives Ceiling stains are often tricky liars; water usually runs down rafters or plywood before dripping, meaning the actual hole could be ten feet uphill from the damp spot on your drywall. Contractors often charge a minimum diagnostic fee just to locate the problem, adding roughly $150 to your final bill before they even lift a hammer. By performing early leak detection yourself, you skip this “discovery phase” and provide the roofer with the exact location of the failure, keeping more money in your pocket. This
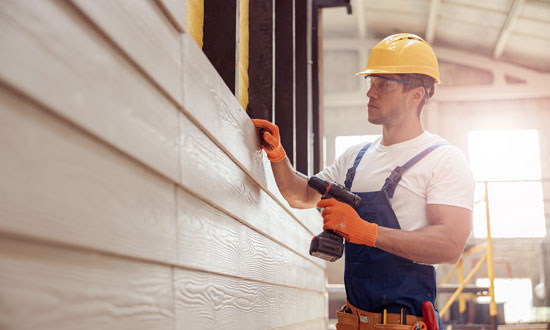
How Much to Replace Siding on a House in New Jersey
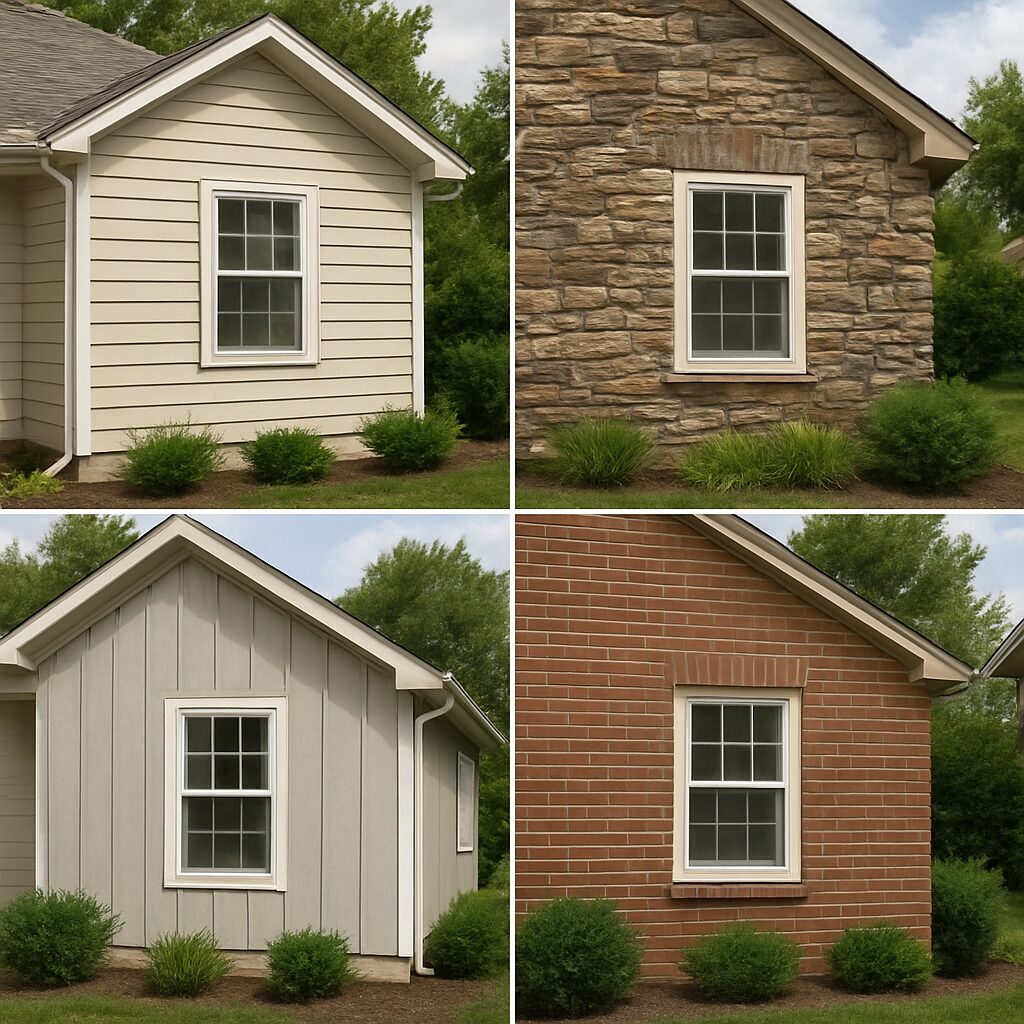
Replacing siding on a house in New Jersey is a significant home improvement project. It can enhance curb appeal and increase property value. But how much does it cost? The cost varies based on several factors, including the size of your home and the materials you choose. Vinyl and fiber cement are popular options, each with its own price range. Understanding these costs is crucial for budgeting and planning. This guide will help you navigate the complexities of siding replacement in New Jersey. We’ll explore material options, installation processes, and key factors affecting prices. Let’s dive into the details to make informed decisions. Average Siding Replacement Cost in New Jersey The average cost to replace siding on a house in New Jersey typically ranges from $5,000 to $15,000. This variance in price depends largely on the size of your home and the material used. Vinyl siding, a popular and cost-effective choice, usually costs between $3 and $8 per square foot. Fiber cement, known for its durability, comes at a higher cost of $5 to $13 per square foot. Several factors contribute to these costs, including labor rates in your area. Urban areas tend to have higher labor costs due to increased demand and cost of living. Considerations like the architectural complexity of your home can also influence pricing. The number of stories or unique design features can increase labor intensity. For an accurate estimate, it’s important to obtain multiple quotes. Contact several local contractors to compare prices and services. These insights provide a starting point for budgeting your siding replacement project. Anticipate variations and plan accordingly to avoid surprises. Siding Material Options and Their Costs When selecting siding for your home, various materials are available, each with unique benefits and costs. Choosing the right siding involves balancing initial expense, durability, and maintenance needs. Vinyl siding is a top choice due to its cost-efficiency and low upkeep. It offers considerable savings upfront and requires little maintenance over the years. Fiber cement siding attracts homeowners seeking durability and a premium appearance. Although pricier than vinyl, it offers longer-term resilience and better aesthetic options. Other options include wood, metal, and stone veneer. Each has distinct costs and aesthetic appeals, warranting careful consideration. Consider these common siding materials: When choosing siding, evaluate life cycle costs, not just initial expenses. Understand the longevity, maintenance demands, and energy efficiency each material provides. Additionally, consider your home’s architectural style and neighborhood norms. This holistic approach ensures you select siding that fits both your aesthetic desires and budget constraints. Vinyl Siding Cost in NJ Vinyl siding is a preferred choice for many New Jersey homeowners due to its affordability and versatility. Prices for vinyl siding typically range from $3 to $8 per square foot, making it one of the most cost-effective options available. In addition to being affordable, vinyl siding is available in various styles and colors. This allows homeowners to customize their home’s exterior to match personal taste while maintaining a budget-friendly approach. Key benefits of vinyl siding include: Overall, vinyl siding’s combination of low cost and variety makes it an appealing choice for those looking to update their home’s exterior without breaking the bank. Fiber Cement Siding and Other Popular Choices Fiber cement siding offers durability with a high-end look, making it a favorite among homeowners who prioritize long-term value. While its cost, between $5 and $13 per square foot, is higher than vinyl, it provides excellent resilience and an elegant appearance. Apart from fiber cement, other attractive materials include wood and metal. Wood offers a natural, classic appeal but requires more maintenance and carries a higher price. Metal siding boasts low maintenance and fire resistance, offering a more modern look. However, it can cost more than vinyl and should be considered based on specific needs. Consider these materials based on: Making a well-informed choice can ensure enduring satisfaction and curb appeal for your home’s exterior. Key Factors Affecting Siding Replacement Prices Several factors can impact the cost of siding replacement in New Jersey. The size and style of your home play a significant role in determining overall expenses. Larger homes require more materials and labor, driving up costs. Similarly, intricate architectural details or multiple stories add complexity, increasing labor costs. Labor rates are another crucial factor. Urban areas in New Jersey may have higher labor costs compared to rural locations. Weather conditions in New Jersey also affect siding prices. Seasonal changes can influence demand, leading to price fluctuations. Consider the following factors when estimating replacement costs: Additionally, homeowners should factor in the potential need for repairs. Underlying issues like water damage or insulation problems can increase project costs. Obtaining multiple quotes from reputable contractors can ensure competitive pricing and help you identify the best option for your project. By understanding these factors, you can better anticipate the overall investment required for siding replacement. This knowledge will help you make informed decisions and budget accordingly. Siding Installation Process in New Jersey The siding installation process in New Jersey involves several key steps to ensure a successful outcome. Before new siding can be applied, the old siding must be removed. This step may also involve disposing of debris, which can affect overall costs. Once the old siding is gone, the surface is prepared. This preparation ensures that the new siding can adhere properly and last longer. Contractors may also install moisture barriers at this stage. Next, the new siding is installed. This step requires precision to ensure protection against weather and improve home aesthetics. Depending on the complexity, this phase can take a few days to complete. Key steps in siding installation include: Finally, a thorough inspection ensures that the siding is properly installed. Contractors conduct a cleanup after the project concludes, leaving your home refreshed and ready for the elements. How to Estimate the Amount of Siding You Need Estimating the amount of siding needed is essential for budgeting and planning. Begin by measuring the surface area of your home’s exterior walls. Calculate the area

What Commercial Construction Services Cover Permitting and Inspections
Navigating the world of commercial construction can be complex. Permitting and inspections are crucial components of this process. They ensure projects meet safety and legal standards. Understanding construction permits and building inspections is essential. These elements safeguard the integrity of a project. They also protect public safety and property value. The permit process involves obtaining legal authorization. This is required before any construction work begins. It ensures compliance with local building codes and regulations. Building inspections occur at various stages. They verify that construction adheres to approved plans. Inspections help identify potential issues early. Commercial construction services often handle these tasks. They streamline the permit process and manage inspection requirements. This expertise can save time and reduce errors. Professionals in the industry must stay informed. Changes in construction regulations and building codes are frequent. Staying updated is key to successful project completion. This guide will explore these topics in detail. It aims to provide a comprehensive understanding of permitting and inspections in commercial construction. Understanding Permitting and Inspections in Commercial Construction In commercial construction, permits and inspections are vital. They form the backbone of safe and compliant building practices. Without them, projects face various risks. Permitting is more than just paperwork. It provides a blueprint for legal compliance. Obtaining the right permits ensures alignment with local rules and regulations. Inspections occur throughout the project’s lifecycle. They verify each phase meets safety standards and approved plans. This process reduces risks and improves quality control. Key aspects of permitting and inspections include: Professional construction services often manage these tasks. They help navigate complex regulations, ensuring your project stays on track. Understanding these processes is essential. It helps avoid costly delays and potential legal issues. By partnering with experts, stakeholders can ensure a smoother permit and inspection journey. The Permit Process: Step-by-Step Overview The permit process is a structured journey in construction. Each step ensures compliance with building laws and standards. A successful permit process prevents potential legal and safety issues. Initially, a project proposal is crafted. This proposal details the scope and nature of the construction. Clear and detailed plans are crucial for permit approval. Next, submission to relevant authorities is done. This stage involves providing all necessary documents. It’s essential to include technical drawings and project outlines. Once submitted, the review phase begins. Authorities assess the plans to ensure compliance with building codes. This can take time, depending on project complexity. Key Steps in the Permit Process: After the review, feedback is provided. This may require revising plans to meet standards. Addressing feedback promptly is key to minimizing delays. Upon approval, permits are issued. Construction can then proceed with confidence and authority. It’s important to keep these permits accessible throughout the project. Finally, maintaining communication with authorities aids in smooth progress. Timely updates prevent unforeseen hindrances. Staying informed eases navigation through the permit landscape. Types of Construction Permits Required Different projects require distinct permits. Knowing which permits are essential prevents roadblocks. Each type aligns with specific project elements. Environmental permits focus on ecological impact. These are crucial if the project affects local ecosystems. They ensure adherence to environmental protection laws. Safety permits are equally vital. They guarantee that safety regulations are incorporated into construction plans. These permits safeguard workers and the public. Common Construction Permits: Zoning permits address land-use requirements. They ensure the construction aligns with local zoning laws. These permits prevent legal disputes over land utilization. Acquiring the right permits is a critical step. Careful planning and thorough research aid in identifying necessary permits. This ensures a seamless construction phase devoid of permit-related interruptions. Navigating Local Building Codes and Construction Regulations Understanding local building codes is indispensable. These codes dictate how structures must be designed and built. Familiarity with them ensures that projects comply from the outset. Building codes cover a range of topics. They include fire safety, structural integrity, and energy efficiency. Awareness of these aspects is vital for project success. Key Elements of Building Codes: Construction regulations also play a crucial role. These regulations enforce public safety and welfare. Compliance is mandatory and beneficial in the long run. Engaging professionals with expertise in codes and regulations can be advantageous. They offer insights into integrating compliance into designs. This proactive approach minimizes risks of non-compliance and project delays. Inspection Requirements Throughout the Project Lifecycle Inspections are crucial at various stages of a construction project. They ensure compliance with approved designs and standards. Adhering to inspection requirements avoids costly rework. Initial inspections often occur before any work begins. This stage verifies that conditions match submitted plans. It’s essential for confirming foundational aspects. During construction, regular inspections check ongoing compliance. These may include plumbing, electrical, and structural assessments. Continuous checks ensure standards are consistently met. Key Inspection Requirements: The final inspection occurs just before project completion. It ensures everything aligns with the required codes and quality benchmarks. This inspection is vital for obtaining final approval. Documentation of inspection outcomes is important. Proper records support project integrity and facilitate future maintenance. Inspection reports serve as valuable references for compliance validation. Open communication with inspectors fosters a collaborative relationship. It encourages a smoother inspection process and quicker resolution of issues. Early engagement and proactive adherence to guidelines benefit the overall project. Common Stages of Building Inspections Building inspections typically happen at predefined stages. These checkpoints ensure comprehensive compliance throughout construction. Detailed oversight in these phases prevents unanticipated issues. Initial foundation inspections focus on the base structural components. Proper execution at this stage is critical for building stability. Thorough evaluation here paves the way for future stages. Structural frame inspections follow as the project progresses. Inspectors assess the skeletal framework, ensuring it meets safety standards. Any deviations are corrected to maintain integrity. Typical Inspection Stages: Next, systems such as plumbing and electrical are scrutinized. These systems must adhere to specific safety codes. Ensuring their correct installation avoids future operational failures. The final inspection ties all previous evaluations together. It verifies overall project compliance with initial plans and codes. This step is crucial for
What is a Level 2 Chimney Inspection?
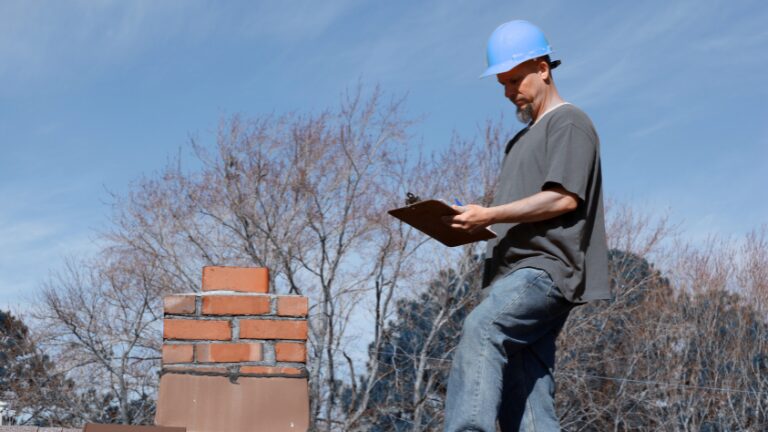
Your chimney does more than create ambiance on cold winter nights—it’s a critical safety system that protects your home from fire hazards and carbon monoxide exposure. Regular maintenance isn’t optional; it’s essential. According to the National Fire Protection Association (NFPA), chimneys should be inspected at least once a year, with more comprehensive evaluations required under specific circumstances. A Level 2 chimney inspection represents the mid-tier assessment in the NFPA’s three-level inspection framework. While less invasive than a Level 3 inspection, it goes far beyond the basic visual checks of a Level 1, providing homeowners with a thorough understanding of their chimney’s condition. Whether you’re buying a new home, switching from wood to gas, or recovering from storm damage, understanding what a Level 2 inspection entails can help you make informed decisions about your home’s safety. This guide breaks down everything you need to know about Level 2 chimney inspections—from when they’re required to what technicians look for, and how much you should expect to pay. Understanding the Three Levels of Chimney Inspections Before diving into the specifics of a Level 2 inspection, it helps to understand how it fits within the broader inspection framework established by the NFPA. Level 1 Inspection is the most basic assessment, appropriate when your chimney has been in regular use without any known issues. Technicians perform a visual inspection of readily accessible portions of the chimney, verifying that the structure is sound, the flue is clear, and all connections are secure. Think of it as a routine checkup—suitable for annual maintenance when nothing has changed with your fireplace or heating system. Level 2 Inspection becomes necessary when conditions change or when a more detailed examination is warranted. This inspection includes everything from Level 1, plus access to attics, basements, crawl spaces, and the use of specialized video scanning equipment to examine the interior of the flue. It’s designed to uncover hidden problems that could compromise safety. Level 3 Inspection is the most invasive option, required only when serious problems are suspected or confirmed. Technicians may need to remove portions of the chimney or building structure to access concealed areas. These inspections typically follow significant damage events or when Level 2 findings indicate potentially severe structural issues. What Exactly is a Level 2 Chimney Inspection? A Level 2 chimney inspection provides a comprehensive evaluation of your entire chimney system, from the firebox at the bottom to the cap at the top. Unlike a basic visual check, this inspection employs advanced technology and requires technicians to access areas of your home that aren’t part of routine maintenance. The inspection includes all components examined in a Level 1 assessment, then extends further. Technicians climb onto your roof to inspect the chimney crown, flashing, and cap. They enter your attic to verify proper clearances from combustible materials and check for signs of water damage or deterioration. In basements and crawl spaces, they examine the foundation of the chimney system, looking for structural issues or exposure to moisture. The defining feature of a Level 2 inspection is the use of closed-circuit video scanning equipment. A specialized camera is inserted into the flue, providing a detailed view of the interior surfaces. This technology allows inspectors to identify cracks, gaps in mortar joints, deterioration of the liner, and creosote buildup—issues that would be invisible during a standard visual inspection. Video scanning serves another crucial purpose: documentation. The recorded footage becomes part of your inspection report, providing clear evidence of the chimney’s condition. This documentation proves invaluable during real estate transactions, insurance claims, or when planning repairs. When is a Level 2 Inspection Required? The NFPA 211 standard specifies several scenarios that trigger the need for a Level 2 inspection. Understanding these requirements helps homeowners know when to schedule this more comprehensive assessment. Real estate transactions top the list. Whether you’re buying or selling a home with a chimney, a Level 2 inspection provides both parties with detailed information about the system’s condition. For buyers, it reveals potential problems before closing. For sellers, it demonstrates transparency and can prevent last-minute negotiation issues. Changes to your heating system also necessitate this level of inspection. Switching from wood to gas fuel requires verification that the flue is appropriately sized and in good condition. Installing a new insert, replacing an old appliance, or adding a fireplace to your home all constitute changes that impact how the chimney functions and what safety considerations apply. After damage events, a Level 2 inspection becomes critical. If your home has experienced a chimney fire, the intense heat can create cracks in the flue liner that aren’t visible from below. A building fire elsewhere in the structure may have affected the chimney’s integrity. Weather events—severe storms, lightning strikes, or earthquakes—can shift masonry, damage flashing, or create other structural problems. Even if external damage isn’t obvious, internal issues may exist. Extended periods of non-use represent another trigger. If you’ve recently moved into a home and don’t know the chimney’s service history, or if a fireplace hasn’t been used for more than a year, a Level 2 inspection provides assurance that restarting use is safe. When problems arise, a Level 2 inspection helps diagnose the cause. Smoke backing up into your home, difficulty maintaining a fire, strange odors, or visible deterioration all warrant investigation beyond what a basic inspection can provide. The Step-by-Step Level 2 Inspection Process Understanding what happens during a Level 2 inspection helps homeowners prepare and know what to expect. The process is thorough and systematic, typically taking between one and two hours to complete. Accessible Area Assessment Technicians begin by protecting your home, laying down drop cloths around the fireplace area. They then examine all readily accessible portions of the system, starting with the firebox. The inspection covers the condition of firebrick or refractory panels, the firebox floor, and any combustibles nearby. They check the fireplace opening measurements to ensure the flue is properly sized. The damper receives close attention—inspectors verify it opens and closes properly and shows
How to Install Siding Starter Strip on a Hillside House
When building or renovating a home on a hillside, you are not just battling the usual elements—you are fighting gravity, accelerated water runoff, and unique structural shifts. While the view from a sloped property is often breathtaking, the engineering required to protect it is demanding. One of the most critical, yet often overlooked, components of this protection is the siding starter strip. The starter strip is the foundation of your entire siding job. If it is unlevel, the whole wall will be crooked. If it is loose, your siding could blow off in high winds. And on a hillside home, where moisture moves differently and wind loads can be higher, a faulty starter strip can lead to catastrophic water damage behind your cladding. This comprehensive guide will walk you through exactly how to install a siding starter strip on a hillside house, ensuring your home remains beautiful, dry, and structurally sound for decades to come. Understanding the Starter Strip: More Than Just a Base Before you pick up a hammer, it is crucial to understand what a starter strip actually does. In standard construction, it locks the first course of siding in place. However, on a hillside property, its role expands significantly. The First Line of Defense Against Moisture Hillside homes are subject to “microclimates.” The slope of the land can accelerate rainwater runoff toward your foundation or create wind tunnels that drive rain upwards against the house. The starter strip acts as a mechanical locking mechanism that resists this uplift. Furthermore, it works in tandem with your flashing to ensure that water running down the sheathing is directed out away from the foundation, rather than wicking up behind the siding. Structural Integrity on Uneven Ground Foundations on slopes often settle differently than those on flat ground. A properly installed starter strip helps absorb some of these minor shifts without buckling the siding panels above it. It establishes a level reference line for the entire house, visually correcting the optical illusions often caused by sloping terrain. Pre-Installation Assessment: Mastering the Slope Installing siding on a hillside requires more preparation than a standard flat-lot project. You cannot simply snap a line and go; you must understand the geometry of the ground and the house. 1. Analyze the Slope and Drainage Walk the perimeter of the foundation. On the uphill side, the grade (ground level) might be significantly higher than on the downhill side. 2. Check the Foundation Level Foundations are rarely perfectly level, but hillside foundations can have significant variance due to the stepped footings often used in their construction. Essential Tools and Materials Hillside installations can be dangerous and physically demanding. Having the right gear ensures safety and precision. The Tool Kit The Materials Step-by-Step Installation Guide Now, let’s get to the installation. Follow these steps meticulously to ensure a weatherproof and level start. Step 1: Surface Preparation and Flashing Before the starter strip touches the wall, the surface must be impeccable. Step 2: Establish Your Chalk Line This is the most important step for aesthetics. Step 3: Fastening the Starter Strip Step 4: Handling the Slope and Grade Changes On a hillside, you may encounter areas where the foundation steps up or down. Final Inspections and Weatherproofing Once the strip is on, you aren’t quite finished. Verification Use your laser level one last time. Shine it across the top of the installed starter strip. It should be dead flat. If you see dips or humps, adjust the fasteners now. Fixing it later means ripping off the entire wall of siding. Pest Prevention Hillside homes often have decks or crawlspaces that attract wildlife. Check the gap between the starter strip and the foundation. If it is larger than 1/4 inch, consider installing a perforated vent strip or wire mesh to keep mice and wasps out of the rain screen. Weatherstripping In extreme hillside environments subject to driving rain, applying a bead of flexible exterior sealant behind the top edge of the starter strip (where it meets the sheathing) can provide a secondary gasket against water intrusion. Conclusion: A Foundation for Success Installing a siding starter strip on a hillside house is a precision game. It demands a clear understanding of water management, a steady hand with a laser level, and patience with the unique topography of your land. When done correctly, this strip does more than just hold up the first row of vinyl or fiber cement; it acts as a structural safeguard that extends the lifespan of your home’s exterior. By following these steps, you ensure that your hillside home stands resilient against wind, rain, and gravity. However, hillside projects often reveal hidden complexities—from rotting sub-structures to difficult drainage issues—that require a professional eye. Professional Siding Services in New Jersey If the complexities of hillside installation feel overwhelming, or if you simply want the peace of mind that comes with hiring certified experts, Deluxe Construction NJ is here to help. We specialize in high-quality siding solutions tailored to the unique landscapes of New Jersey. Whether you are in North or South Jersey, our team understands the local climate, building codes, and architectural challenges. Why Choose Deluxe Construction NJ? Don’t let a sloped lot compromise your home’s protection. Ensure your siding is installed correctly from the very first strip. Contact Deluxe Construction NJ today for your free estimate. Get a Free QuoteCall us: +1 (201) 552-1543Email: deluxeconstruction.nj@gmail.com

How to Install a Chimney Liner
A crackling fire is the centerpiece of a cozy home during the winter months. It provides warmth, ambiance, and a gathering place for family. However, the hidden structure that allows you to enjoy that fire safely—the chimney flue—is often ignored until a problem arises. Over time, heat, moisture, and combustion byproducts can wreak havoc on the inside of your chimney, leading to cracks, deterioration, and significant safety hazards. This is where a chimney liner comes into play. Think of it as a protective inner skin for your chimney. It channels smoke and toxic gases out of your home while protecting the masonry walls from extreme heat and corrosive byproducts. While many homeowners are tempted to tackle this project themselves to save money, it is a complex task that leaves zero room for error. Installing a chimney liner is not just about fitting a pipe into a hole; it is about physics, airflow, and fire safety. If you are considering this upgrade, you need to understand exactly what is involved. This guide covers the critical steps of installation, the necessary safety precautions, and how to decide if this is a job for you or a professional. What Is a Chimney Liner and Why Is It Crucial? A chimney liner is a conduit made of clay, ceramic, or metal (typically stainless steel or aluminum) installed inside a chimney flue. Its primary purpose is to contain the combustion products—smoke, carbon monoxide, and embers—and direct them outside. Older homes were often built with clay tile liners, or sometimes no liner at all. Over decades, these clay tiles can crack due to the rapid expansion and contraction caused by heating and cooling cycles. Once the liner is compromised, heat can transfer to combustible materials in your home’s framing, potentially causing a house fire. Furthermore, cracks allow deadly carbon monoxide to leak into living spaces. Installing a new liner, particularly a durable stainless steel one, improves the efficiency of your appliance. A properly sized liner creates the correct draft, meaning your fire burns cleaner, produces less creosote, and keeps your home warmer. Safety First: The Risks of Improper Installation Before picking up a tool, you must understand the stakes. Chimney maintenance is life-safety work. If a liner is installed incorrectly, the consequences can be devastating. Fire Hazards The most immediate risk is a chimney fire. If the liner is not sealed correctly, or if insulation is skipped in a cold chimney, creosote can build up rapidly. Creosote is a highly flammable substance that accumulates from burning wood. If it ignites, it burns at extremely high temperatures. A compromised or poorly installed liner allows this heat to escape the flue and ignite the wood framing of your attic or walls. Carbon Monoxide Poisoning Your chimney is an exhaust pipe. Its job is to remove toxic gases. If the connection between your furnace, water heater, or wood stove and the liner is not airtight, carbon monoxide can backdraft into your home. This gas is odorless, colorless, and potentially fatal. Structural Damage Condensation is another enemy. If the flue gases cool down too quickly because the liner isn’t insulated or sized right, they turn into acidic moisture. This acid eats away at mortar joints and bricks from the inside out, leading to expensive structural repairs down the road. Professional Installation vs. DIY The debate between hiring a pro and doing it yourself usually comes down to cost versus assurance. The Case for DIYThe primary motivation for DIY installation is financial. Professional installation can cost significantly more than the price of materials alone. By purchasing a kit and doing the labor yourself, you could potentially save hundreds, or even thousands, of dollars. For an experienced handy person with a deep understanding of construction and safety protocols, this is a feasible project. The Case for ProfessionalsHowever, the savings come with high risk. Certified chimney sweeps understand local fire codes, draft physics, and the specific requirements of different fuel types (gas, oil, wood). They have the tools to handle unexpected obstructions and the expertise to ensure the warranty on the liner remains valid. Most importantly, a professional installation comes with peace of mind. If you make a mistake during a DIY install, you might not know until it is too late. Conducting a Thorough Chimney Inspection If you decide to proceed, the first step is a comprehensive inspection. You cannot simply drop a new liner into a dirty or damaged chimney. Start by cleaning the chimney. You must remove all soot, debris, and existing creosote buildup. A clean chimney allows you to see the condition of the flue walls. Use a high-powered flashlight or, ideally, a chimney inspection camera to look for: If the chimney has significant structural damage or sharp offsets, a standard flexible liner might get stuck or torn during installation. In such cases, professional repair is required before lining can begin. Accurate Measurements Are Key Ordering the wrong size liner is the most common mistake. You need two critical numbers: the diameter and the length. Determining DiameterThe diameter of the liner must match the exhaust outlet of your appliance. If you have a wood stove with a 6-inch exhaust, you generally need a 6-inch liner. However, you also need to measure the interior width of your masonry flue. If your flue is narrow, a round liner might not fit, and you may need an ovalized liner or a smaller diameter (if code allows for your specific appliance). Determining LengthMeasure from the top of the chimney crown down to where the appliance connects to the wall or the damper. It is always smarter to order a liner that is a few feet longer than you think you need. You can easily cut excess steel, but you cannot stretch a liner that is too short. Code Compliance and Permits Never skip the paperwork. Chimney modifications almost always require a building permit. Local building codes dictate the type of material you can use, the insulation requirements, and the necessary clearances from

How to Measure Gutter Size for Your Home
When a heavy storm rolls through, the last thing you want to worry about is whether your gutters can handle the deluge. Water is the single biggest enemy of your home’s foundation, siding, and landscaping. An undersized gutter system is like trying to drain a swimming pool with a drinking straw—it simply cannot keep up with the volume, leading to overflows that cause costly rot, mold, and basement flooding. Many homeowners assume that standard gutters are a “one-size-fits-all” solution. In reality, the 5-inch gutters found on most homes are sufficient for many, but certainly not all, situations. Factors like steep roof pitches, complex rooflines, and intense local rainfall patterns can quickly overwhelm a standard system. Whether you are planning a DIY upgrade or vetting professional quotes, understanding how to measure and size your gutters is critical. This guide will walk you through the mathematics and mechanics of gutter sizing, ensuring your home stays dry even during the heaviest downpours. And for those in the Garden State who prefer expert handling, Deluxe Construction is your Gutter Contractor In New Jersey, ready to ensure your system is perfectly calibrated to your home’s needs. Understanding Your Gutter System Before pulling out the tape measure, it helps to understand the components you are sizing. A rainwater drainage system isn’t just the horizontal troughs hanging off your eaves; it is a synchronized network designed to capture and redirect water flow. The Gutter Profile The “gutter” itself is the horizontal channel. The most common residential profile is the K-style gutter, which has a flat bottom and a decorative face that mimics crown molding. K-style gutters are incredibly efficient because they hold more water than their rounded counterparts. The other primary option is the Half-Round gutter, which looks like a tube cut in half. These are often found on historic homes or chosen for their specific aesthetic appeal. While beautiful, half-round gutters generally have a lower water capacity than K-style gutters of the same width. The Downspouts Downspouts are the vertical pipes that carry water from the gutter to the ground. If your gutters are the highway, downspouts are the exit ramps. If the exits are blocked or too narrow, traffic jams (overflows) occur. Properly sizing your downspouts is just as important as sizing the gutters themselves. Factors Influencing Gutter Size Determining the right size involves more than just measuring the length of your roofline. You need to calculate the volume of water your roof sheds during a storm. This is influenced by three main variables: Tools and Materials Needed To get an accurate measurement, you will need to gather a few supplies. Safety is paramount—if you are not comfortable on a ladder, it is best to estimate from the ground or call a professional like Deluxe Construction. Step 1: Calculating Your Roof Area The first step in sizing your gutters is determining the square footage of the roof area that drains into each gutter run. You don’t necessarily need to climb on the roof to do this; you can often estimate it from the ground. Measure the Footprint Measure the length and width of the house section covered by the gutter. For a simple gable roof (two sides), you would measure the length of the gutter run and the distance from the eaves to the roof peak (the slope width). Formula:$$Area = Length \times Width$$ However, this only gives you the planar area. Because rain doesn’t always fall straight down—and because steep roofs catch wind-driven rain—you need to adjust this number based on the pitch of your roof. Step 2: Determining the Roof Pitch Factor The “pitch” is the slope of your roof, usually expressed as the number of inches the roof rises for every 12 inches of horizontal run (e.g., a 4/12 pitch means the roof rises 4 inches for every foot of width). How to Find Roof Pitch Once you have your pitch, use the Roof Pitch Factor table below to adjust your area calculation. This factor adds a buffer to account for the speed and volume of water shedding off steeper slopes. Roof Pitch Factor Table: The Adjusted Calculation Multiply your initial roof area by the pitch factor to get your Total Adjusted Square Footage. Example:If your roof section is $40 \text{ feet long} \times 15 \text{ feet wide}$, your area is $600 \text{ sq. ft.}$If the roof has a steep 10/12 pitch (Factor 1.2), your calculation is:$$600 \times 1.2 = 720 \text{ Adjusted Square Feet.}$$ Step 3: Determining Rainfall Intensity Rainfall intensity is measured by the maximum inches of rain that can fall in a 5-minute interval. This “flash flood” potential is what causes gutters to overflow. According to data sources like the NOAA Atlas 14, different regions have different maximum intensity ratings. For standard sizing purposes, you can check the U.S. Weather Bureau records for your specific city. However, a safe standard used by many contractors in areas with heavy seasonal storms (like New Jersey) is to plan for a high-intensity event. If you are unsure, consulting with a local expert like Deluxe Construction can provide the exact rainfall intensity data for your specific county. Step 4: Calculating Gutter Capacity Now that you have your Adjusted Square Footage, you can match it against the capacity of standard gutter sizes. The goal is to ensure the gutter is large enough to handle the drainage area without spilling over. Here are the maximum drainage capacities for the most common gutter sizes (assuming K-style gutters, which are standard for most modern homes): K-Style Gutter Capacities Half-Round Gutter Capacities If you prefer the look of half-round gutters, be aware they hold less water: Step 5: Choosing the Right Gutter Size Comparing your math from Step 2 to the capacities in Step 4 will reveal your answer. Scenario A: Your adjusted roof area is 1,200 square feet. Scenario B: You have a massive, steep roof section measuring 6,000 adjusted square feet draining into a single gutter run. Why Go Bigger? Even if your math says
Does a Gas Fireplace Need a Chimney?
When considering a gas fireplace for your home, you might wonder, Does a gas fireplace need a chimney? Unlike traditional wood-burning fireplaces, gas fireplaces have different installation, venting, and exhaust requirements. In this article, we’ll explore the options available and answer some common questions about gas fireplace chimneys and venting systems. Gas Fireplace Venting Requirements Gas fireplaces don’t always need a chimney in the traditional sense. However, they require a venting system to expel exhaust gases safely. The type of venting system you need depends on the kind of gas fireplace you choose. Let’s take a look at the different gas fireplace venting options. Gas Fireplace Flue Options A flue is a conduit for exhaust gases from a fireplace. While traditional wood-burning fireplaces use a chimney flue, gas fireplaces can have various venting solutions. Depending on the model and your home’s layout, there are several options for venting a gas fireplace: Chimney vs. Venting for Gas Fireplaces When comparing a chimney vs. venting for gas fireplaces, it’s essential to understand the difference. A chimney is typically associated with wood-burning fireplaces. It relies on a tall, vertical structure to expel smoke. In contrast, gas fireplaces use venting systems that direct exhaust outside, but they may not require a traditional chimney. A gas fireplace with a direct-vent or B-vent system will be much more efficient than relying on a chimney to handle the exhaust. Gas Fireplace Installation Guidelines Installing a gas fireplace is a precise process that must follow manufacturer guidelines and local building codes. If your home does not already have a chimney, you can still install a gas fireplace using venting systems that do not require one. Be sure to work with a professional to ensure your fireplace is correctly installed, safely vented, and compliant with all regulations. Chimneyless Gas Fireplace: What You Need to Know A chimneyless gas fireplace can be an excellent option for those who don’t have a chimney in their home or prefer not to install one. These models, such as vent-free fireplaces, don’t require a chimney or venting system. However, they may release small amounts of combustion byproducts into the room, which is why they should only be used in well-ventilated spaces. Additionally, local regulations might restrict the use of vent-free fireplaces due to concerns about indoor air quality. Direct Vent Gas Fireplace Installation When it comes to installing a direct-vent gas fireplace, this system requires a special two-chamber vent. One chamber brings in fresh air from outside, while the other vents exhaust gases outdoors. This type of installation is more efficient and safer than traditional chimney systems. It’s essential to work with professionals who specialize in gas fireplace installation to ensure the system is set up correctly. Gas Fireplace Exhaust Requirements Gas fireplaces produce carbon monoxide as a byproduct of combustion. Therefore, they need an effective venting system to remove this harmful gas safely. Whether you choose a direct vent system or a traditional chimney, it’s critical to have an exhaust system in place to keep your home safe and breathable. Conclusion So, does a gas fireplace need a chimney? It depends on the type of fireplace you choose. Many modern gas fireplaces use alternative venting systems, such as direct vent or B vent, which do not require a traditional chimney. If you’re considering a gas fireplace, be sure to consult with a professional to determine the best venting option for your home. About Deluxe Construction NJ Deluxe Construction NJ provides premium chimney services to homes and businesses of all sizes in New Jersey. Our experienced chimney contractors specialize in inspections, repairs, installations, and maintenance to keep your chimney safe, functional, and efficient. From rebuilding deteriorating masonry to installing new chimney systems, we deliver solutions tailored to your property’s needs. Contact us today for your free chimney service quote! By understanding the different venting systems for gas fireplaces and how they work, you can make an informed decision about which type is right for your home. Whether you need a traditional chimney or a more modern venting system, the experts at Deluxe Construction NJ can guide you through the process.
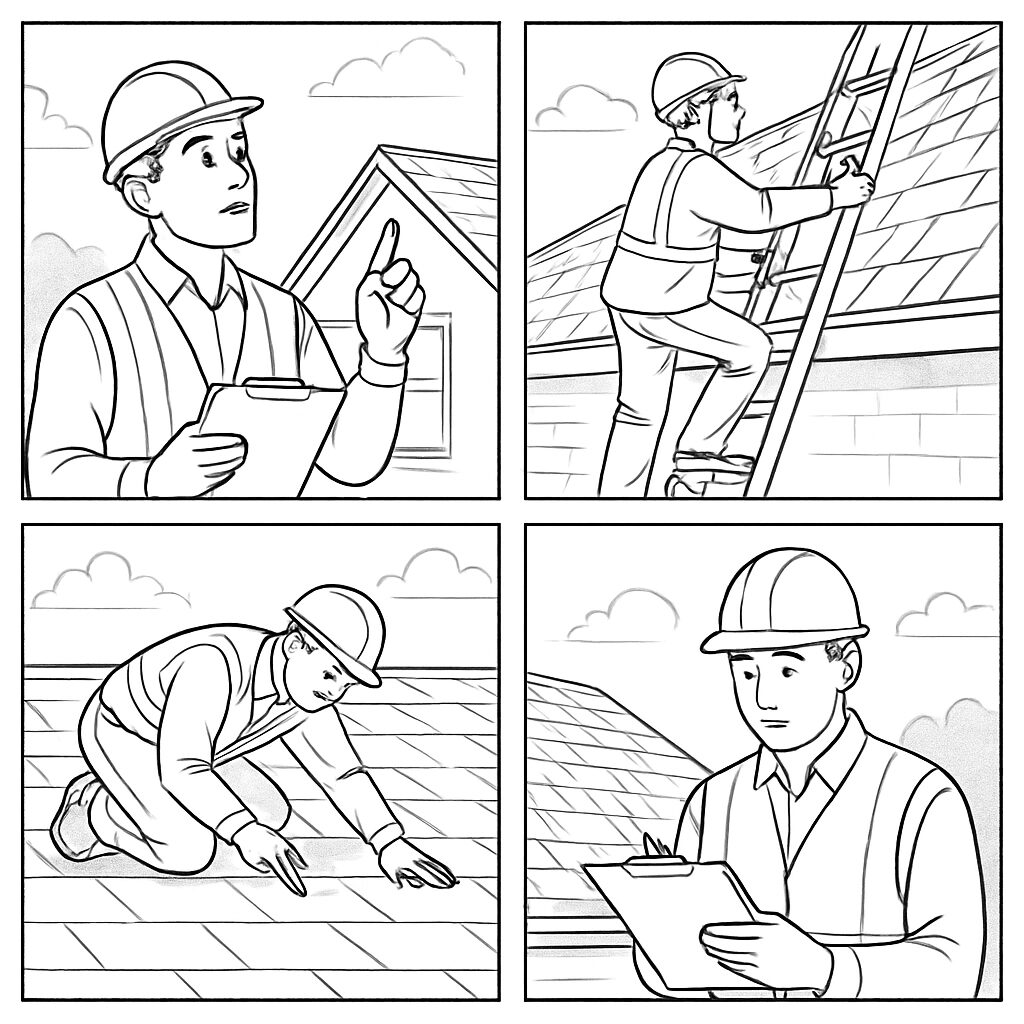
How To Get a Roof Certification In New Jersey
If you’re a homeowner in New Jersey, ensuring the integrity of your roof is crucial. Not only does a sound roof protect your home from the elements, but it also provides peace of mind and can increase your property value. One way to certify your roof’s condition is by obtaining a roof certification. In this article, we’ll explore what a roof certification is, why it’s important, and the steps to obtain one in New Jersey. Before diving into the process, let’s clarify what a roof certification entails. A roof certification is a professional assessment of your roof’s condition. Typically conducted by licensed roofing contractors, this certification provides an estimate of the roof’s lifespan and its ability to withstand environmental factors. Why You Need a Roof Certification A roof certification is particularly important if you’re planning to sell your home. Buyers often seek this assurance to avoid unforeseen repairs. Even if you’re not selling, it’s a proactive way to maintain your property. Key benefits include: Steps to Obtain a Roof Certification in New Jersey Now that you know why a roof certification is important, let’s discuss how to get one in New Jersey. Step 1: Find a Qualified Roofing Contractor The first step is to locate a qualified roofing contractor. Look for a licensed professional with a good reputation. Companies like Deluxe Construction NJ are known for their expertise in roof inspections and certifications. Tips for Choosing a Contractor Step 2: Schedule a Roof Inspection Once you’ve selected a contractor, schedule a roof inspection. The contractor will assess various aspects of your roof, including: Step 3: Review the Inspection Report After the inspection, the contractor will provide a detailed report. This document outlines the roof’s condition, any necessary repairs, and an estimate of its remaining lifespan. Review this report carefully. Common Findings in Roof Inspections Step 4: Make Necessary Repairs If the inspection reveals issues, you’ll need to address them before obtaining certification. Discuss repair options with your contractor. They can guide you through the process and offer solutions that fit your budget. Step 5: Obtain the Roof Certification Once repairs are complete, and the roof meets all standards, the contractor will issue a roof certification. This document typically includes: Maintaining Your Roof Certification To maintain your roof certification, regular maintenance is key. Here are some tips to prolong the life of your roof: Conclusion Obtaining a roof certification in New Jersey is a straightforward process that provides significant benefits. Whether you’re selling your home or simply ensuring its upkeep, a roof certification is a wise investment. By following these steps and working with reputable contractors like Deluxe Construction NJ, you can ensure your roof remains in top condition. Remember, a well-maintained roof is not only about protection but also about enhancing your home’s value and appeal. So, take the necessary steps today to secure a roof certification and enjoy peace of mind knowing your home is safeguarded.